

I’d just really like to dedicate this post to my favorite champion in League of Legends. TEEEMO! He was my very first main and I still enjoy playing him to this day. Although, I have been known to throw him into some unorthodox situations continuing to push the boundary. But as we all know Teemo the Yordle is primarily the most effective in the top lane. This is due to his extreme bullying potential against the regular top lane bruisers who are primarily melee. This does not discount him from playing other positions or mean that he is less viable in other positions bc I assure you he can perform well in ANY role. I would like to discuss the strategies that I have found to be tried and true.
 First of all, in ranked play people are going to hate you for picking Teemo in any role. This is pretty much the part where you dont play him in ranked unless you are certain you can win lane or get first blood bc the team morale will tilt and blame will certainly fall upon your squishy pick. Probably my favorite matchups for Teemo would be Nasus, Tryndamere, Irelia, Garen, and Malphite. You can easily shut these champions down and secure first kill with a good flash and ignite. I think its necessary to extend your laning phase as long as possible on Teemo to give you the initial gold advantage in items for when you do start roaming. Being the Teemo that inspires fear on the rift is the main focus of this post. I believe that regardless of your opponent and your laning phase you can still be viable in any situation given the right positioning and the gods grace of MAP AWARENESS.
Which brings me to the first major breakdown of shroom placement and ward placement. I have created a little diagram for the top lane and I’m sorry about it being the old school two bush top map but I was lazy and couldn’t find a good pic of the three bush top map. In this diagram shroom placement is as follows broke down into three categories: Pushing, Stalling/Trading and Hugging. The most likely starting point at your level 6 will be the stall and trade part of lane. Depending on which side of the map you are playing from will determine proper placement but lets just say we are playing from blue side(I’m terribly color blind). Which is bot-left right?lol.
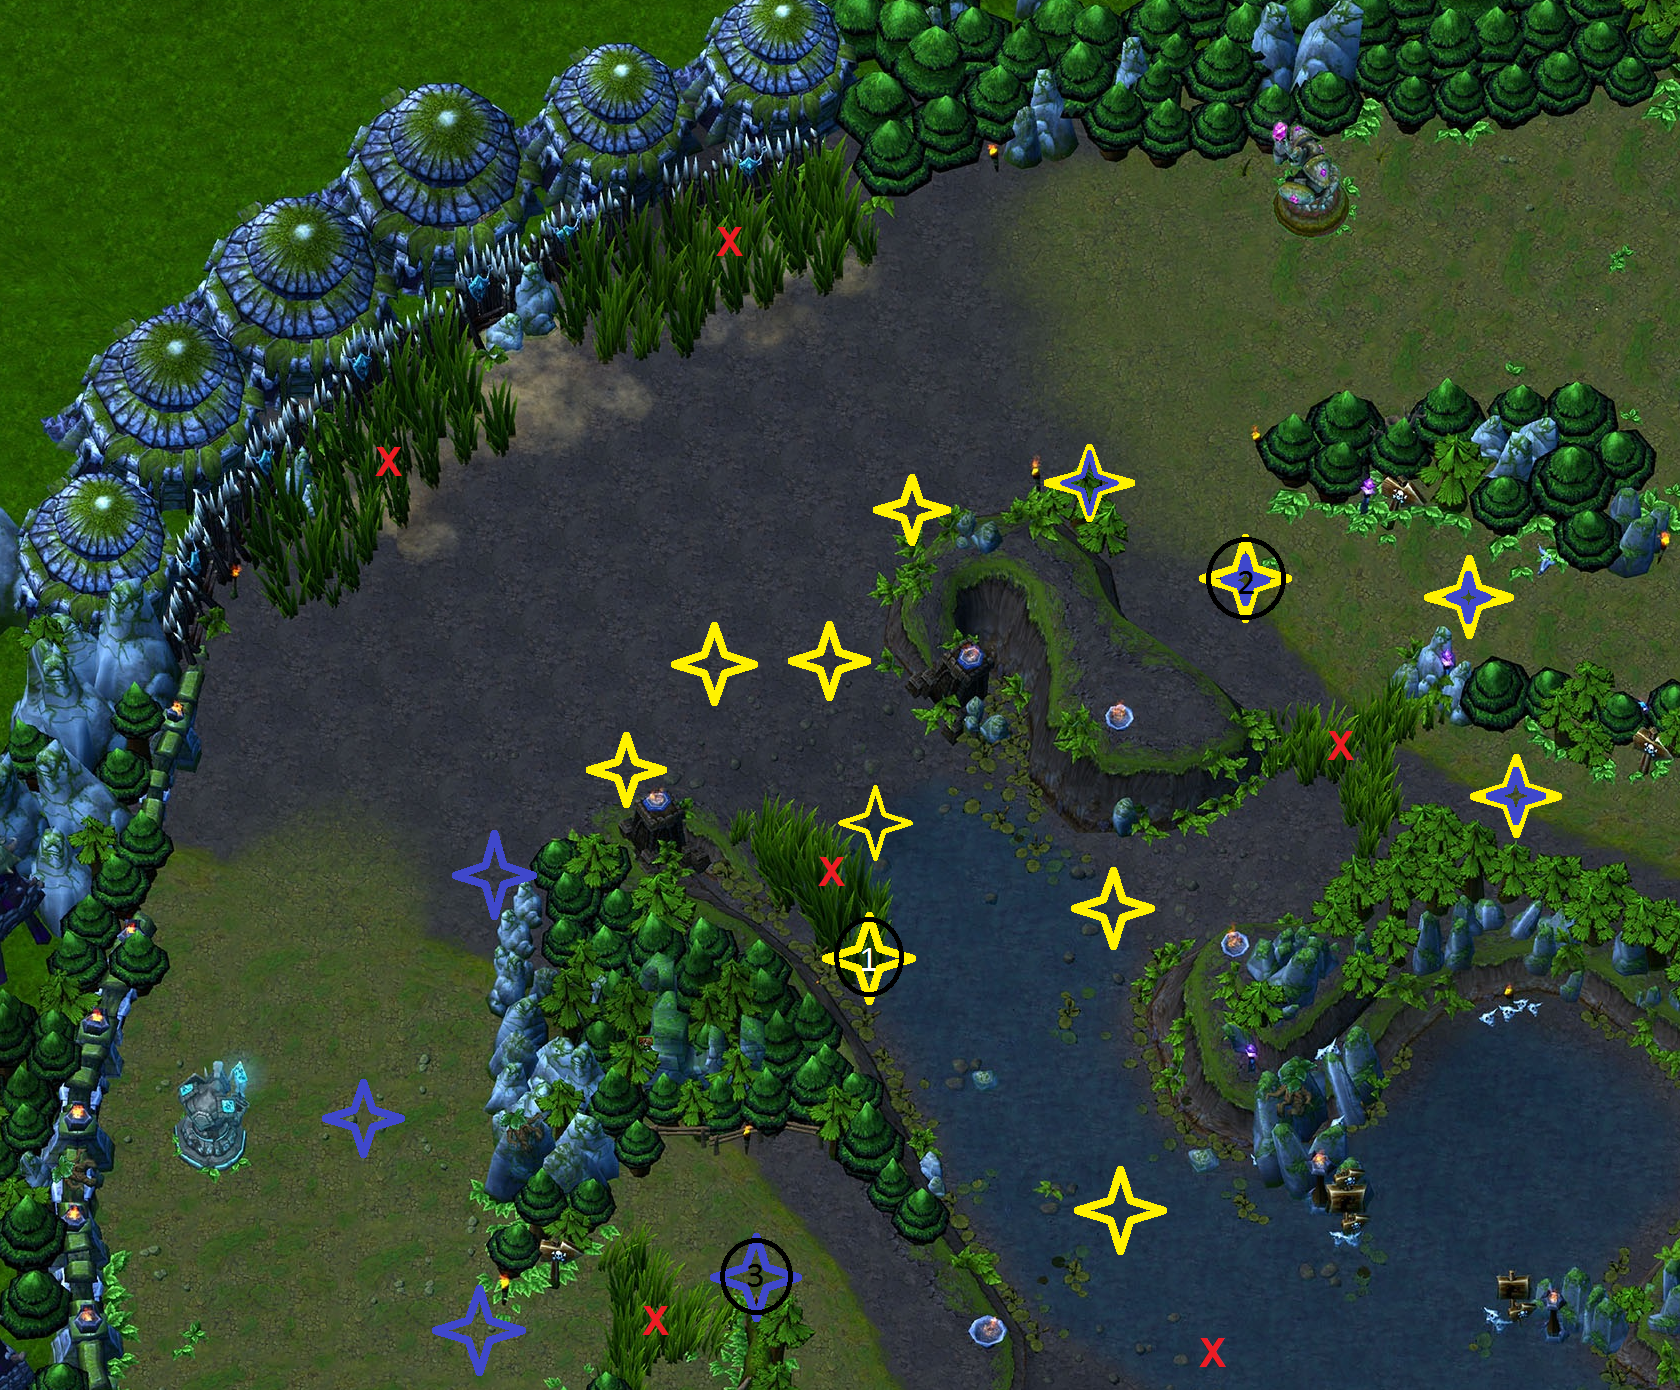 So, at this point you may have been ganked already in an early attempt to slow down your progress but hopefully you were smart and didnt over extend too far after lvl 3 unless you had wards up appropriately. If you arent behind too much and feel comfortable pushing your lane you will first need to ward tri-bush and place a shroom in the #1 yellow star spot right at the entrance of the river bush. A common mistake I see other players making is when placing a shroom against the wall they make the possibility of a hit so much smaller when they don’t capitalize on the area of a champion that is extruding off the wall while running along side it. For this reason I place my shrooms directly on the edge of the champion hit box from the wall. NEVER DIRECTLY TOUCHING OR IN THE WALL..
Back to the top lane discussion. Depending on who you are going against and how comfortable you are with Teemo the lane may have you hugging turret or pushing turret but most likely stalling and trading. In the unlikely chance that you will be facing a hard hitting mage in the top lane as this is counter meta ;P you will find yourself hugging turret and will want to shroom the blue star # 3 and the other blue positions to prevent a dive from being completely successful. Champions such as Jax or Wukong may give you considerable opposition and can be tricky. Ryze and Lissandra are also very tough opponents for Teemo. The only stupid hard match-up I can think of is a good Yorick its pretty much impossible to win that lane if they have any grain of what his abilities do. The best way to defeat pre 6 yorick is to start corrupting potion and bait him into overextending and possibly taking a few turret shots before you flash and ignite with a q and auto-attack combo.
There comes a time in Teemo’s life when he likes to push tower and deny the enemy any farm with hard harass. This is a great idea against mega big late game champs such as Nasus or Tryndamere who need the advantage of farm to really make a difference. There is a pretty high possibility that during a push like this that your enemy will try to organize a gank. In which case we are gonna make sure that just doesnt work out so well. The yellow and blue star #2 and all other yellow and blue stars are prime placement against ganks while pushing lane. If you notice there are no shrooms in tri-bush. IMO tri-bush is optional. In laning phase I dont like to shroom here bc this is usually where they pink or sweep before a gank. This is my usual trinket ward placement. Its not advisable to 1v2 anyone who has any type of CC but if you have good shroom placement its very possible to get 2 kills when the enemy gank attempts start. With all that being said as Teemo your laning phase usually doesnt last as long as you would like either losing to a counter pick or winning extremely fast.
I would just like to note that Teemo has many different roles he can play in all positions. By ROLE I mean a specific job that he performs outside of his positioning in the laning phase. I believe Teemo to be one of the best split push assassins in game and would really like to share my experience with his late game playstyle bc a lot of ppl believe he is irrelevant late game and its simply not true. I will be sharing many more strategies including a full blown map of seriousness with shroom and ward placements also baiting techniques and team fight setups and positioning.
